
I bought a pair of full-grain leather boots two weeks before a 10-mile loop in the Catskills. The boot shop guy said they felt great. I agreed. By mile four, I had a quarter-sized blister on my right heel and a hot spot the size of a poker chip on my left arch. I finished the hike, but I paid for every step of it.
That was early in my hiking life. Since then, I’ve put boots through trails in the Appalachians, the desert Southwest, and plenty of muddy Pacific Northwest forest. I’ve learned what actually works when it comes to breaking in boots — and what’s just gear-store advice that sounds good but doesn’t hold up on trail.
By the time you finish reading this, you’ll know the full break-in process. The timeline, the at-home methods, the sock strategy, and how to read your feet along the way. Let’s get into it.
Why New Hiking Boots Hurt Your Feet (And What’s Actually Happening)
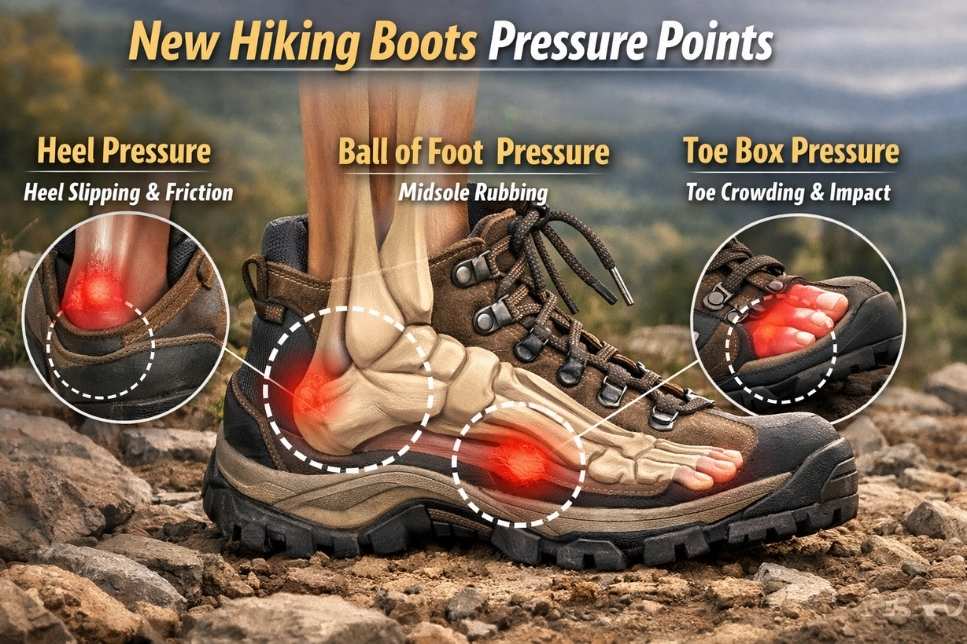
New hiking boots hurt because the materials haven’t flexed to your foot shape yet. Hot spots and blisters form wherever the boot resists your natural stride — especially at the heel, ball of the foot, and toe box.
What stiffness actually means in a hiking boot
Stiffness in a hiking boot isn’t a flaw. It’s the design. A stiff midsole protects your feet on uneven terrain. A firm upper keeps your ankle stable on rocky descents. The problem is that new boots are built to be stiff for everyone, not for your specific gait and foot shape. That rigidity creates pressure points wherever your foot moves differently from the boot’s current shape. The break-in process is your foot and the boot working out that difference over time.
The most common hot spots and why they form
Three spots cause most of the trouble. The heel slips up and down if the boot hasn’t conformed to your heel cup yet — that repetitive friction turns into a blister fast. The ball of the foot takes pressure if the midsole is still too firm to flex with your stride. The toe box pinches if the boot hasn’t stretched laterally or if you’re hitting the front of the boot on downhill sections. Each one has a structural cause, which means each one can be addressed with the right technique.
Leather vs. synthetic: they break in differently
Full-grain leather molds to your foot over months of use. It’s a slower process, but once done, the boot fits like it was made for you. Synthetic uppers — mesh, nylon, or a combination — soften faster, sometimes within a few weeks. But they don’t mold to your foot the same way. You get comfort more quickly, but less of that custom-fit feeling. Neither is better in every situation. They’re just different, and that difference matters when you plan your break-in timeline.
Waterproof membranes and why they add stiffness
If your boots have a Gore-Tex liner or a similar waterproofing membrane, expect a longer break-in. That membrane wraps the inside of the upper and adds a layer of material that doesn’t flex as freely as plain leather or fabric. The boot still breaks in. It just takes more time and mileage to get there. Hot spots on waterproof boots can also sit in slightly different places, because the liner changes where your foot contacts the upper.
I still think about that Catskills trip when I lace up a new pair. By mile two, I knew exactly where I’d gone wrong. I’d skipped every step I’m about to walk you through. If I’d done even half of this, I’d have finished that hike on my feet instead of my will.
How Long Does It Take to Break In Hiking Boots? {#how-long-to-break-in}
Most hiking boots need 4 to 6 weeks of gradual use before they feel fully broken in. Lightweight trail runners may take 1 to 2 weeks. Stiff leather mountaineering boots can take 2 to 3 months.
The honest timeline — by boot type
Lightweight day hikers with synthetic uppers are the fastest. Two to three weeks of regular use and you’re usually in good shape. Mid-cut trail boots — the most common type for general hiking — sit in the 4 to 6 week range. Full leather boots, especially heavier ones designed for multi-day backpacking or mountaineering, need 8 to 12 weeks minimum. These aren’t soft suggestions. They’re what it actually takes for the materials to stop fighting your feet.
What happens if you rush it
I’ve seen this go wrong more times than I can count, including with my own feet. Rushing the break-in process means your first long hike becomes the break-in hike — and your feet pay the price. Blisters are the obvious result. But pushed further, you can end up with black toenails from toe box pressure on long descents, or tendon soreness from a midsole that hasn’t flexed into alignment with your stride yet. A week of careful at-home wear is always worth more than a day of trail suffering.
Got a trip coming up? Here’s the minimum viable break-in plan
If you have two to four weeks before departure, here’s what I’d do. Wear the boots around the house every day for the first week — at least 30 to 45 minutes per session. In week two, start short walks on pavement, 1 to 2 miles. In weeks three and four, do two or three trail walks of 3 to 5 miles each, adding elevation if your trip involves it. This won’t fully break in a stiff leather boot, but it will handle the worst pressure points before you hit the trail for real.
I once bought a pair of Vasque boots 10 days before a trip to Shenandoah National Park. I wore them every evening, walked the neighborhood in them twice, and did one 4-mile loop on a local path. I still got a small blister on day two of the trip — but nothing that stopped me. Without that prep, I’d have been hurting badly by mile three on the first day.
At-Home Methods to Speed Up the Break-In Process {#at-home-methods}
Wear your new boots around the house daily for 30 to 60 minutes before hitting the trail. Use thick hiking socks, flex the boots manually, and focus on areas that feel tight.
The wear-around-the-house method (and how to do it right)
Don’t just slip them on while you watch TV. Lace them the same way you would on trail — firm through the ankle, snug but not crushing over the top of the foot. Wear the same socks you plan to hike in. Move around enough that your foot actually flexes the boot: go up and down stairs, walk across different floor surfaces, crouch down. After each session, note where the boot felt tight or where you felt pressure. That map tells you what still needs to soften.
Manual flexing and when it helps
Hold the boot in both hands and flex it forward, the way your foot pushes through a stride. Work the heel cup with your thumb — push it inward and outward to loosen the stiffening material. This is most useful on leather boots and stiffer synthetic constructions. It won’t work miracles, but it gets the boot moving before your foot has to do all the work. Spend two or three minutes on each boot after you take them off at night.
Leather conditioner for leather boots
A good leather conditioner — I’ve used Sno-Seal, Nikwax Leather Conditioner, and a traditional mink oil — makes the upper noticeably more pliable before your first walk. Apply a thin coat with a rag, work it into the leather, let it soak in overnight. Don’t drench the boot. One light coat is enough to soften the leather without affecting the waterproofing or weakening the structure. Do this before any wear, then again after the first few sessions if the leather still feels stiff.
What NOT to do — myths that damage boots
Soaking boots in water to speed up break-in is one of the most common bad ideas I’ve heard. Water can warp the midsole, separate the glued layers, and wreck the waterproof membrane. Microwaving a boot is real advice that gets passed around — please don’t. Excessive direct heat from a hair dryer or heater will dry out leather, shrink synthetic materials, and can delaminate the sole. None of these shortcuts work, and all of them can damage a boot that cost you $150 or more.
I tested a pair of Zamberlan 760 boots — full-grain leather, stiff as a board out of the box. I conditioned them twice before the first walk, then wore them around the house for five days. On the first trail walk (a 4-mile loop in the Berkshires), I had zero heel blisters and only one small pressure point near the little toe. I’d had three bad spots on that same boot model years earlier when I’d skipped conditioning. The difference was real.
The Right Socks Make a Bigger Difference Than You Think {#right-socks}
Merino wool or synthetic hiking socks in medium to heavy cushion reduce friction and wick moisture during break-in. Avoid cotton — it holds sweat and creates blister conditions.
Why sock choice matters during break-in specifically
When boots are new, they haven’t developed the interior padding that comes from use. The footbed is firm, the lining is stiff, and the upper hasn’t molded to anything yet. A good hiking sock adds a cushion layer between your foot and those hard surfaces while the boot is still working itself out. Once the boot is broken in, you can adjust your sock weight based on conditions. During break-in, go thicker than you think you need.
Merino wool vs. synthetic hiking socks
Merino wool is warmer, regulates temperature better in a range of conditions, and handles odor far better than synthetics. It’s also more expensive and wears out faster. Synthetic socks — Darn Tough’s nylon blend or Balega’s polyester-based options, for example — dry faster, last longer, and cost less. For break-in purposes, either works well. What matters more than the fiber content is the cushion weight. Medium or heavy cushion. Not trail running weight.
Double-sock method — does it actually work?
The idea is to wear a thin liner sock under a thicker hiking sock. The two layers slide against each other instead of your skin sliding against the boot — so friction drops and blisters become less likely. It works in theory, and it genuinely helps some people. The risk is that two layers of sock add volume inside the boot. If your boot already fits on the snug side, the extra thickness creates new pressure. Try it at home first before committing to it on a long walk.
Blister tape and moleskin — pre-empting hot spots
After your first home session with the boots, take them off and look at your feet. Redness or warmth in any spot tells you exactly where the boot is putting pressure. Before the next session, put a piece of moleskin or kinesiology tape over those spots. This isn’t giving up — it’s using your feet as sensors and acting on the data. I mark hot spots after every new session until they stop appearing. Once a spot stops showing up, that part of the boot has conformed enough to stop causing problems.
A long-ago trip on the John Muir Trail section near Tuolumne Meadows changed my sock strategy for good. I wore lightweight socks with new boots and had a heel blister the size of a half-dollar by lunchtime. I switched to a thicker Darn Tough crew sock the next morning and never had the same problem again. I’ve hiked in Darn Toughs ever since.
Building Mileage the Right Way: Your Break-In Trail Plan {#mileage-plan}
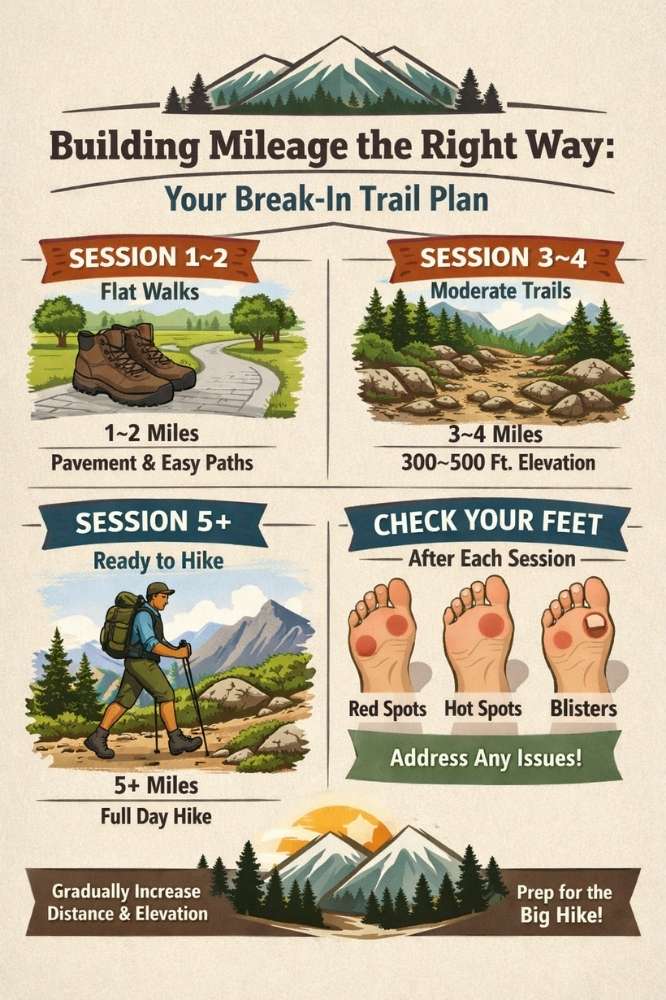
Start with 1 to 2 mile walks on flat ground, then add distance and elevation over 4 to 6 sessions before tackling a long day hike. Let any hot spots fully heal between sessions.
Session 1–2: Flat pavement and easy paths
Your first two sessions should stay on flat ground — pavement, gravel paths, a park loop. Keep it to 1 to 2 miles. When you take the boots off, check for redness, warmth, or pressure marks on your feet. Pay particular attention to the heel, the ball of the foot, and the pinky toe — those are the first places to show problems. If you spot anything, tape it before the next session.
Session 3–4: First real trail, gentle elevation
Once the initial pressure points have quieted down, move to actual trail. Find something with a moderate surface — roots, packed dirt, some light rock — and a gentle grade. A 3 to 4 mile loop with 300 to 500 feet of gain is ideal. This is where you start to feel how the boot performs under real hiking conditions. The heel cup gets tested on descents. The toe box gets pressure on uphills. Take note of anything new that shows up.
Session 5+: Full day hike readiness test
By session five or six, your boot should feel noticeably more comfortable than day one. Here’s how I know mine are ready for a full day: no blistering or significant redness after a 5-mile trail walk, no hot spots that require tape pre-emptively, and the midsole bends smoothly through my stride without catching. If you still feel resistance or stiffness in specific spots, give it two more short sessions before extending mileage.
How to read your feet after each session
Take the boots off and check your feet before you put on regular shoes. Redness that fades in 10 minutes is light friction — normal early on. Redness that stays, or a spot that feels warm to the touch, is a pressure problem that needs addressing. Blistering is the boot telling you clearly that it isn’t ready for that level of use yet. Each session should show fewer issues than the last. If you’re not making progress after six sessions, the fit may be the problem — not the break-in.
Before a 4-day trip through the Adirondacks last fall, I ran my Lowa Renegades through six sessions over three weeks. Session one was a 2-mile neighborhood walk. Session four was the Phelps Mountain trail near Heart Lake — 4.4 miles and 2,200 feet of gain. By session six, the boots felt like old friends. Not a single blister on the Adirondack trip.
Leather vs Synthetic vs Waterproof: Breaking In Each Boot Type {#boot-types}
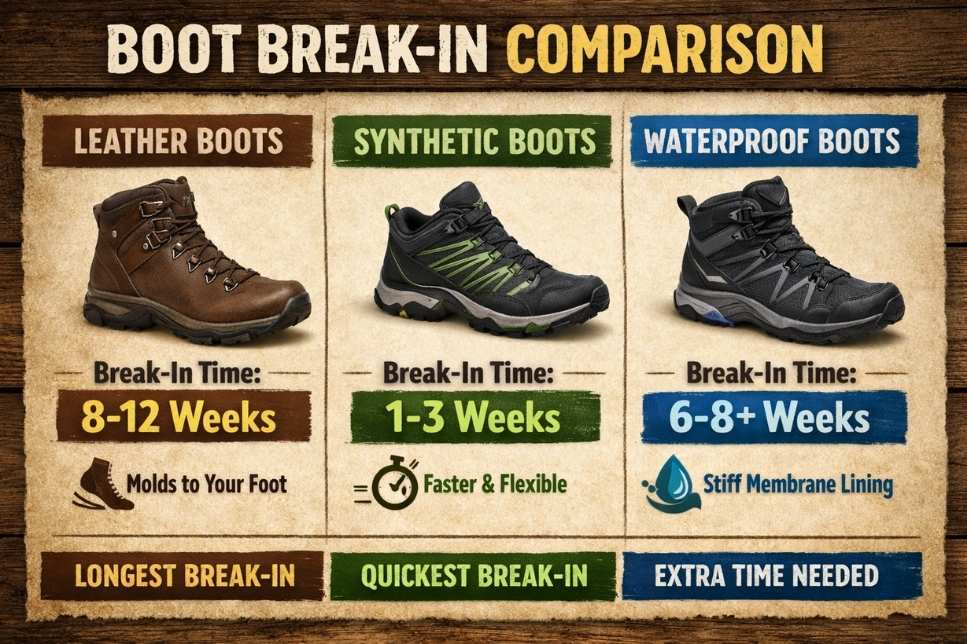
Leather boots take the longest to break in — 6 to 12 weeks of regular use — but mold most closely to your foot. Synthetic boots soften in 1 to 3 weeks. Waterproof boots need extra time due to the stiff membrane lining.
Full-grain leather boots: long break-in, long payoff
Full-grain leather is thick, stiff, and slow to flex. But the payoff is a boot that eventually fits your specific foot better than almost anything else. The leather fibers rearrange themselves to match your foot’s shape, pressure points, and movement patterns. Conditioning the leather before and during break-in speeds this up meaningfully. Expect 8 to 12 weeks before a full leather boot feels fully dialed in — and know that the first 4 weeks will be the hardest.
Synthetic uppers: faster break-in, different care
Boots built with mesh panels, nylon overlays, or synthetic leather move faster. The materials flex more freely out of the box, and you can usually get a synthetic boot trail-ready in 2 to 3 weeks. The catch is that reinforced zones — the heel counter, the toe rand, the ankle collar — are still stiff regardless of the upper material. Those spots still need the same gradual mileage approach. The overall break-in is shorter, but you can’t skip the process entirely.
Waterproof boots: why they take longer and how to handle it
A waterproof membrane adds a rigid layer between the upper and your foot. That membrane doesn’t stretch or mold. What it does, over time, is soften slightly as the boot is flexed repeatedly through use. Waterproof boots often need an extra week or two compared to non-waterproof versions of the same model. If your waterproof boot still feels stiff after 8 weeks of regular use, check the fit — specifically the width. A waterproof boot that’s simply too narrow won’t get comfortable no matter how many miles you put on it.
I’ve owned both a Lowa Tibet GTX — full leather, Gore-Tex lined — and a Salomon X Ultra 3 GTX, which is synthetic with a waterproof membrane. The Lowa took the better part of three months to feel truly comfortable on full-day hikes. The Salomon was trail-ready in about two and a half weeks. For a beginner going on their first multi-day trip, I’d point them toward a quality synthetic boot for exactly this reason. You can always move to leather once you’ve got more trail time and a better sense of your foot’s needs.
Frequently Asked Questions {#faq}
How long does it take to break in hiking boots?
It depends on the boot type. Lightweight synthetic trail boots take 1 to 3 weeks. Mid-cut trail boots take 4 to 6 weeks. Full-grain leather boots take 8 to 12 weeks or more. The key is gradual mileage — not just time on the shelf.
Can you break in hiking boots fast?
You can speed up the process, but you can’t skip it entirely. Wearing them daily around the house, conditioning leather uppers, and doing short walks before long ones cuts weeks off the timeline. Trying to rush too fast — like taking a brand-new pair on a 10-mile hike — usually just means blisters.
Should hiking boots hurt at first?
Mild pressure or stiffness in the first few sessions is normal. Actual pain or blistering is not. If a boot hurts badly in the first hour of wear, it either needs more break-in time or it’s the wrong fit. A well-fitting boot should feel snug and secure — not painful.
How do I stop my new hiking boots from giving me blisters?
Use thick hiking socks, tape any hot spots before sessions, and build mileage gradually. Keep sessions short early on. Check your feet after every walk and address pressure spots before they turn into blisters. Good sock choice — merino wool or quality synthetic — does more work than most people realize.
Is it OK to hike in new boots without breaking them in?
Not on a long hike. For a short, flat walk of 2 to 3 miles, you’ll likely be fine. For anything over 5 miles, especially with elevation, unbroken boots can cause serious blisters, tendon strain, and real discomfort. The prep time is always worth it.
What is the best way to soften stiff hiking boots?
For leather boots, use a leather conditioner before your first wear. For all boot types, wear them around the house daily and flex the boot manually in your hands. Do short walks before long ones. There’s no single trick — it’s cumulative mileage and targeted at-home prep that does the work.
How do I know when my hiking boots are fully broken in?
Your boot is broken in when you can complete a 5 to 6 mile trail walk with moderate elevation and no blistering or significant redness on your feet afterward. The midsole should flex smoothly with your stride. The heel should feel secure without slipping. No pre-emptive taping needed.
Wrapping Up
Breaking in hiking boots is not complicated, but it does take patience. Wear them at home before you wear them on trail. Build mileage in short sessions. Use the right socks. Let your feet tell you where the boot still needs to conform — and act on that information before small pressure spots turn into big problems.
The miles you put in before your trip are never wasted. Every neighborhood walk and easy trail loop is paid back with interest when you’re two days into a backcountry route and your feet feel fine.
If you’re getting your first pair sorted out, I’d love to hear how the break-in is going — drop a comment below and tell me what you’re working with. And if you’re still figuring out which boot to buy in the first place, check out my [Hiking Boot Buying Guide] for a full look at what to look for before you spend the money.
Happy trails.
Read More:
→ Best hiking boots for beginners
→ How to prevent blisters while hiking
→ Best socks for hiking boots
→ Best anti blister socks for hiking
Oscar is a passionate hiker and outdoor enthusiast who has explored trails across mountains, forests, and national parks. He created Oscar Hikes to share honest, beginner-friendly advice on hiking gear, trail safety, and outdoor preparation — so every first-timer can hit the trail with confidence. When he’s not hiking, he’s testing gear and writing guides to make your next adventure easier.
1 thought on “How to Break In Hiking Boots Without Destroying Your Feet”