Packing your hiking backpack correctly is more than just stuffing gear inside; it’s an art that directly impacts your comfort and safety on the trail. A well-packed bag distributes weight evenly, making miles feel shorter and preventing aches and pains. Understanding how to pack a hiking backpack diagram can transform your hiking experience from strenuous to enjoyable.
Proper packing ensures that essentials are accessible and your load feels balanced, reducing fatigue. In our research, aggregate user feedback often highlights that placing heavier items closer to your back and center can improve stability, a principle readily illustrated in effective packing diagrams. Let’s break down how to achieve this for any trail ahead.
Core Backpack Anatomy for Optimal Packing
A hiking backpack isn’t just a sack; it’s a system designed to carry your load efficiently. Familiarizing yourself with its key parts is the first step to packing like a pro. Knowing where things go and why helps you utilize the pack’s full potential.
Key Components You Need to Know
- Internal Frame: Most modern hiking packs feature an internal frame, often made of aluminum stays or plastic sheets. This frame transfers the load to your hips, taking pressure off your shoulders and back.
- Hip Belt: This is arguably the most critical component for weight distribution. A well-padded hip belt should sit snugly on your iliac crest (the top of your hip bones) to carry about 80% of the pack’s weight. It allows you to use your powerful leg muscles, not your weaker back muscles, to carry the load.
- Shoulder Straps: While they shouldn’t bear the brunt of the weight, shoulder straps provide stability and help balance the load. They should contour comfortably over your shoulders without pinching.
- Sternum Strap: This chest strap connects the shoulder straps across your chest. It helps stabilize the pack, preventing it from shifting side-to-side and keeps the shoulder straps from digging into your armpits.
- Load Lifter Straps: Located at the top of the shoulder straps, these straps connect to the top of the pack. Adjusting them pulls the load closer to your body, preventing the pack from pulling backward and enhancing stability.
- Compression Straps: Found on the sides and sometimes front of the pack, these straps cinch down your load. They help reduce the pack’s volume, keep gear from shifting, and make the pack feel more compact.
- Top Lid/Brain: This removable or fixed compartment sits on top of the main pack. It’s ideal for storing frequently needed items or things you want to keep separate.
- Main Compartment: This is the largest section where most of your gear goes. Access is typically from the top, though some packs offer front panel access.
- Sleeping Bag Compartment: Many larger packs have a dedicated zippered compartment at the bottom, designed specifically for a sleeping bag, often with an internal divider that can be removed to create one large main space.
- Pockets and Access Points: Various external pockets (side mesh pockets for water bottles, front shove-it pockets, hip belt pockets) and sometimes front panel zippers offer convenience for storing smaller items or accessing gear without unpacking.
The Foundation: Packing Your Backpack’s Bottom
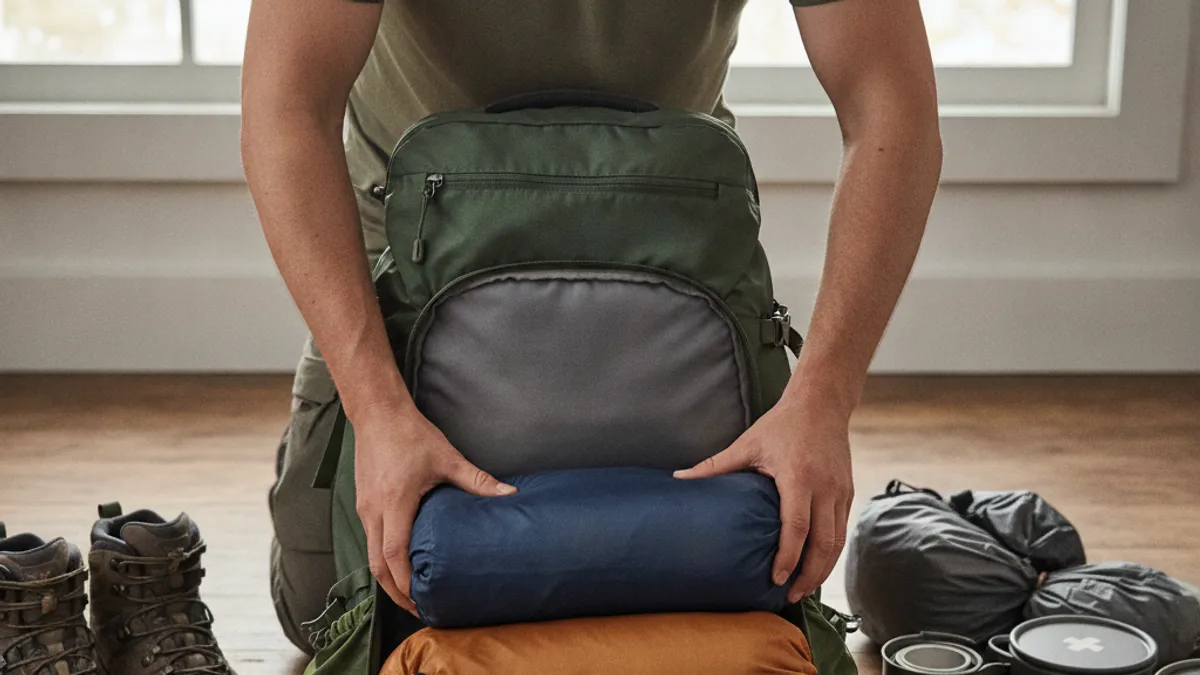
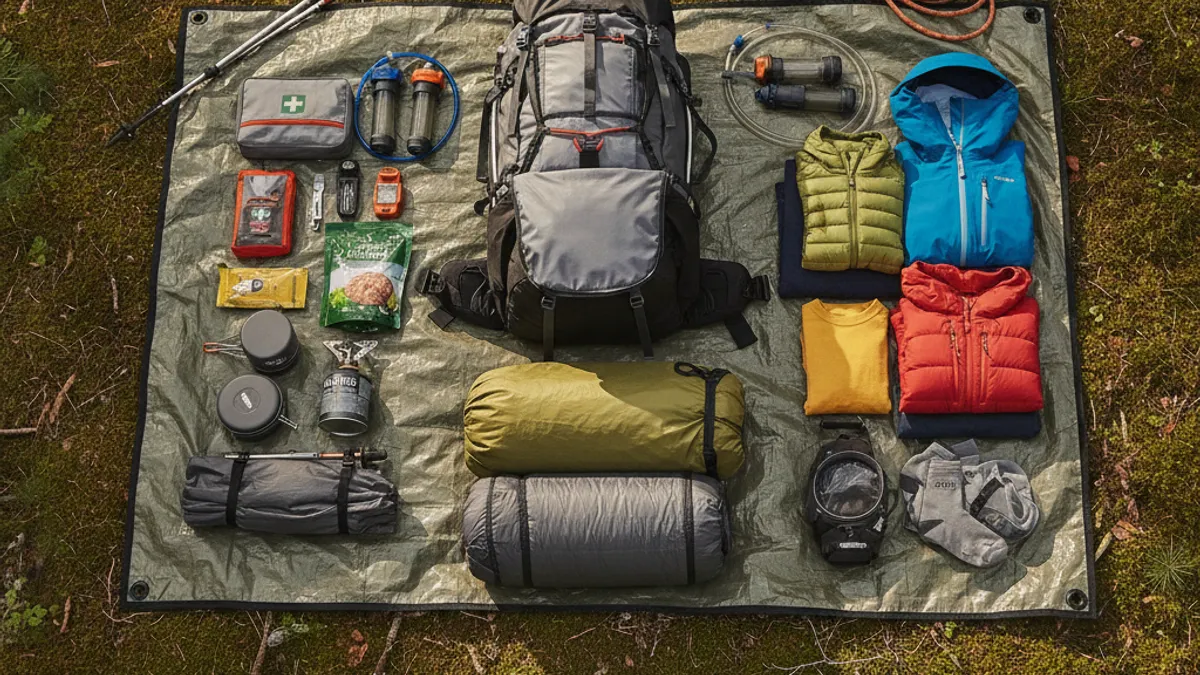
Starting your packing process with the bottom is crucial for stability and comfort. This section is best for items you won’t need until you set up camp, such as your sleeping bag or bulkier clothing. Items placed here should be lightweight but bulky.
What Goes Where for Stability
- Sleeping Bag: This is typically the first item to go into the bottom compartment. It’s soft, compressible, and relatively light, providing a stable base. Per manufacturer specifications, a good sleeping bag can fill a significant portion of this space.
- Camp Shoes/Sandals: If you bring separate footwear for camp, they can slide into the lower corners.
- Extra Layers for Camp: Think bulky items like your puffy jacket or a warm set of base layers that you won’t need to access until you’re done hiking for the day. Rolled up, these can fill gaps nicely.
- Tent Body/Footprint (if applicable): If you’re carrying a tent, the pole and stake bag can be placed at the bottom, while the tent fabric itself can be placed higher up or compressed.
Packing the bottom correctly creates a solid, yet forgiving, foundation. It prevents lighter items from getting crushed and ensures that your heaviest gear is placed higher up and closer to your back, which is a key principle illustrated in any good how to pack a hiking backpack diagram. You’re essentially building a stable platform for the rest of your gear.
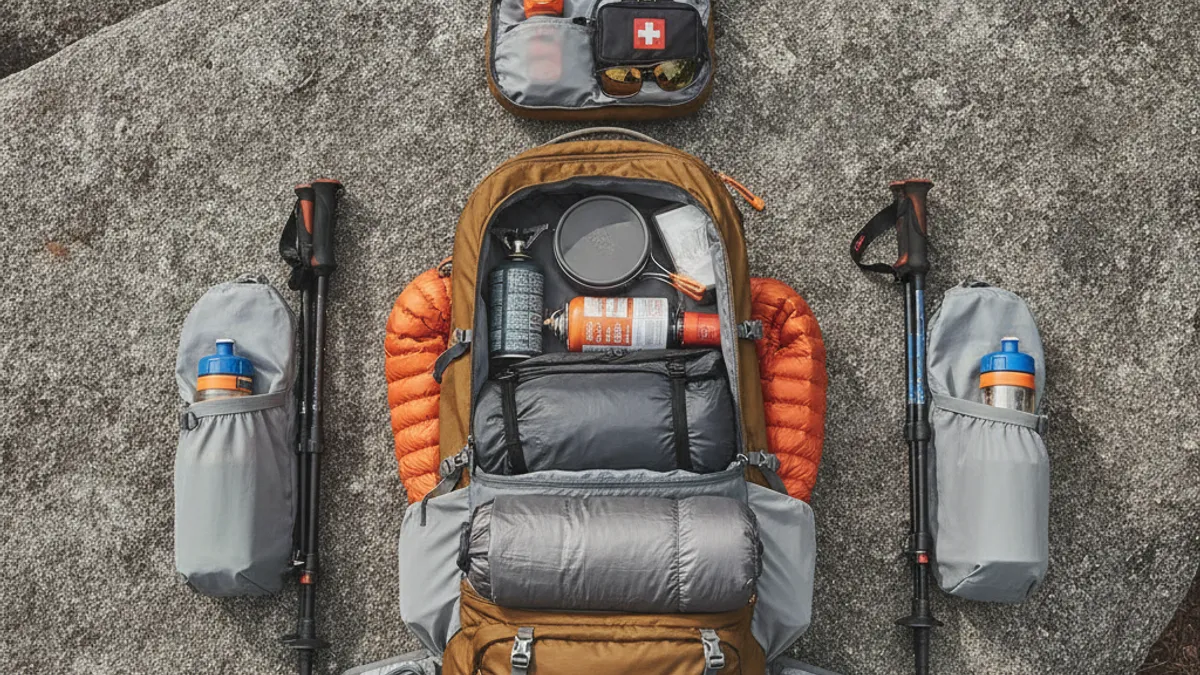
Filling the Core: Heavy Items for Balance
Once the bottom is loaded, you move on to the main compartment’s core. This is where the heaviest items should be strategically placed, directly against your back. This placement is critical for maintaining your center of gravity and preventing the pack from pulling you backward.
Strategic Placement for Comfort
- Tent Body: If not placed at the bottom, the main body of your tent (the fabric part) can go here. It’s dense and has some structure.
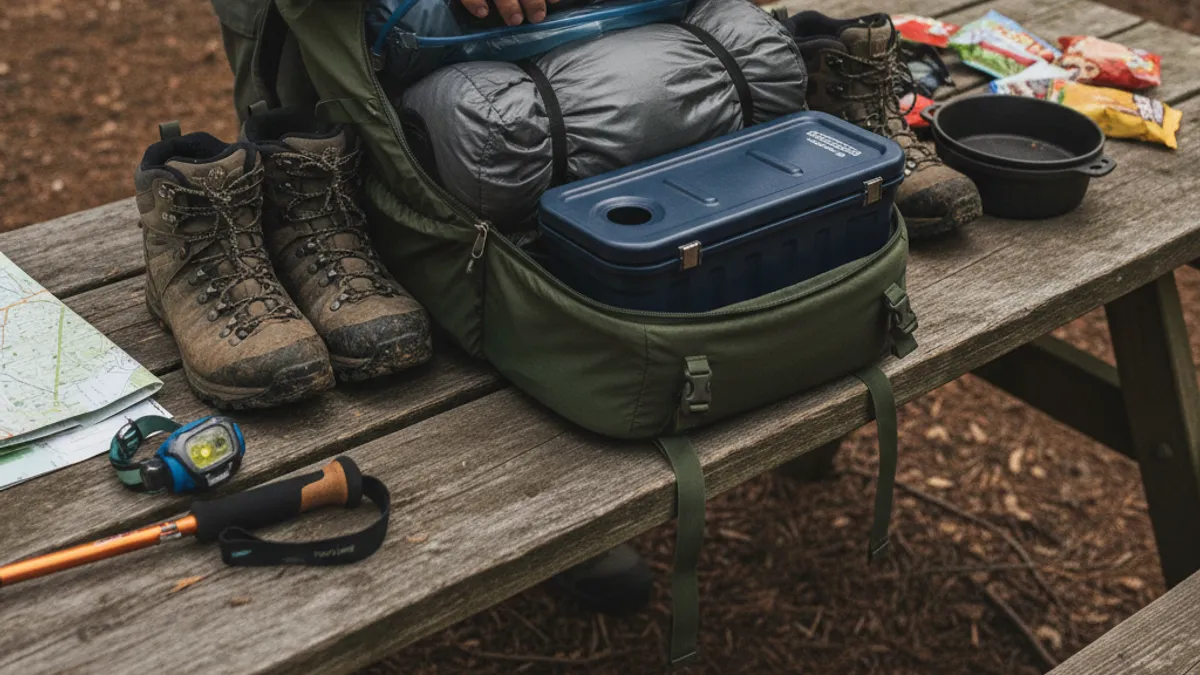
- Food Bag/Bear Canister: This is often the heaviest single item you’ll carry. Placing it close to your spine, at about shoulder blade height, is ideal. If using a bear canister, it’s designed to fit neatly in the core.
- Water Reservoir (full): A full water bladder is heavy. It should go in its dedicated sleeve, positioned behind your back. This keeps the weight centered and close to your body.
- Cook Pot and Stove: These are dense and can add significant weight. Pack them securely in the core.
- Bear Spray (if applicable): For bears, this is critical safety gear. While accessible, some prefer to keep it close to the core if not in a dedicated hip belt pocket, just ensure it’s secure.
- Toiletries Bag: If you pack a larger toiletries kit, it can go in this central zone.
When researching how to pack a hiking backpack diagram, you’ll consistently see heavy items positioned here. Aggregate reviews of hiking packs from various outdoor gear manufacturers, such as Osprey and Gregory, emphasize that this core placement is vital for comfortable load transfer. The goal is to have the pack feel like an extension of your body, not a separate, burdensome weight. If you’re starting on your hiking journey, understanding this principle is as important as knowing what to wear hiking for beginners.
Organizing the Middle and Top Layers
With the bottom secured and the heavy core items in place, you can now focus on the mid and top sections of your backpack. This area is for items you might need to access during the day, or less dense but still important gear. Smart organization here prevents rummaging and keeps you moving efficiently.
Accessibility and Protection
- Mid-Layers (Fleece, Softshells): Items you might shed or put on during the day belong here. They are denser than your insulating camp layers but lighter than your core items.
- Rain Gear (Jacket and Pants): Especially important in unpredictable weather, your rain gear should be easily accessible. Stuffing it into a side pocket or the top of the main compartment works well.
- First-Aid Kit: This is non-negotiable safety gear. It should be easily retrievable, not buried at the bottom. A front pocket or the upper part of the main compartment is a good spot.
- Navigation Tools: Maps, compass, and GPS devices should be readily available for quick checks.
- Headlamp: Even on day hikes, a headlamp is essential. Keep it at the top or in an easily identifiable outer pocket. Check out these hiking headlamp reviews if you’re in the market.
- Snacks: Easily accessible snacks are key for maintaining energy levels on the go. Hip belt pockets are perfect for this. For more ideas, see best hiking snacks for energy.
- Water Filter/Purifier: If you’re not carrying all your water, your filter needs to be within reach to refill bottles during the day.
Think of the middle as the “active use” zone and the top as the “quick grab” zone. This layering strategy prevents items from shifting around within the pack, which can alter the center of gravity and lead to discomfort. Manufacturer guides for packs often suggest packing dense, softer items in the middle to cushion hardware.
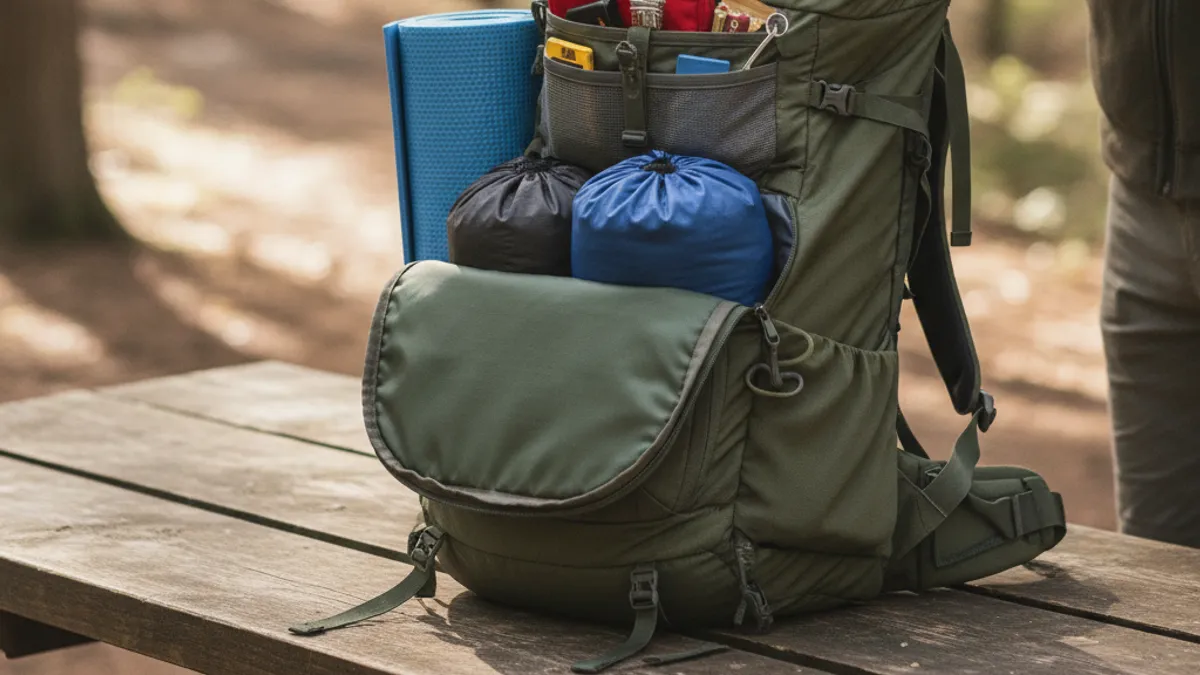
Securing External Gear and Hydration
Beyond the main compartments, your backpack has external features designed for specific items, most notably hydration and gear you need to access without opening the pack. Properly utilizing these external points is key for convenience and keeping things balanced.
Smart Attachment Points
- Water Bottles: Side mesh pockets are the classic spot for water bottles. Ensure they fit snugly. Some users prefer the convenience of a hydration reservoir, which fits into a dedicated sleeve inside the pack. Keeping hydration in mind is crucial for planning; always consider how much water to drink hiking.
- Tent Poles, Trekking Poles, and Ice Axes: Many packs have dedicated loops or straps for carrying these long items vertically on the side or front. Poles should be secured so they don’t swing wildly.
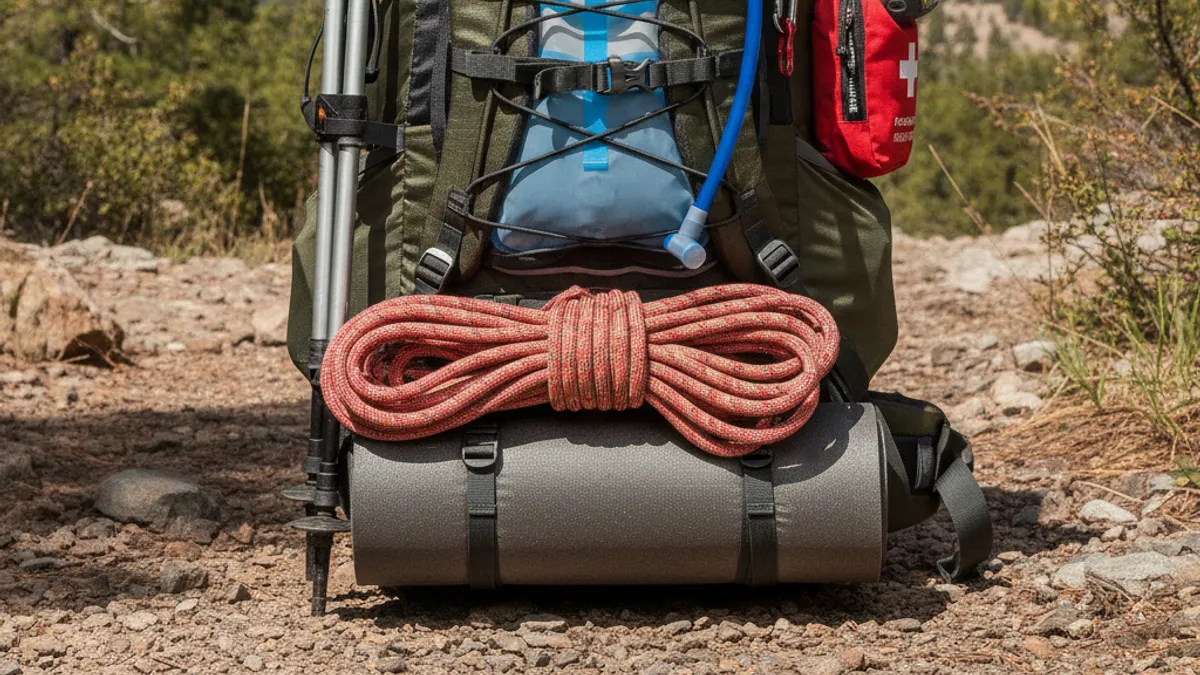
- Sleeping Pad: If your sleeping pad doesn’t fit inside your pack, it can often be secured to the outside using compression straps on the bottom or lid. Make sure it’s tied down tightly to prevent it from snagging on branches.
- Camp Chairs or Extra Bulk: For car camping or less technical trips, lightweight items like camp chairs or bulky sleeping pads might be strapped externally.
- Wet Gear: A wet tent or rain fly can be strapped externally to keep your main pack dry.
When consulting a how to pack a hiking backpack diagram, pay close attention to how these external items are shown. They should be affixed securely and symmetrically to maintain balance. Overloading external straps can create leverage points that pull you off balance, so use external storage judiciously.
The Crucial Step: Adjusting Your Pack
Getting your pack adjusted correctly is what turns a potentially uncomfortable load into a manageable one. This is where those external straps and padded cushions really do their work. A properly fitted pack should feel like a natural extension of your body, not a burden.
Hip Belt, Shoulder Straps, and Sternum Strap
- Loosen Everything: Before putting the pack on, loosen the hip belt, shoulder straps, load lifters, and sternum strap.
- Position the Hip Belt: With the pack on your shoulders, slide it down until the hip belt rests directly on the top of your hip bones (iliac crest). This is the most important step for proper weight transfer.
- Tighten the Hip Belt: Cinch the hip belt snugly. It should feel firm but not painfully constricting. Roughly 80% of the weight should rest here. Manufacturer specs on packs often detail the ideal snugness.
- Tighten Shoulder Straps: Pull the shoulder straps down and back. They should contour smoothly over your shoulders, lightly hugging them. They provide stability, not primary support.
- Engage Load Lifters: Adjust the load lifter straps until they are at about a 45-degree angle to your shoulder straps, pulling the top of the pack closer to your back. This helps prevent the pack from pulling away from your body.
- Connect and Tighten Sternum Strap: Clip the sternum strap and tighten it just enough to keep the shoulder straps from sliding outwards. It should be comfortable across your chest.
If your pack feels like it’s pulling backward, tighten the load lifters. If it feels like it’s digging into your shoulders, you might need to adjust the hip belt position or tighten it more. An improperly adjusted pack, even if packed perfectly, can cause significant discomfort.
Common Backpack Packing Mistakes to Dodge

Even with a good diagram, it’s easy to make packing errors that can ruin your hike. Most of these stem from not understanding weight distribution or accessibility needs. Avoiding these common pitfalls will make a huge difference in your trail experience.
- Putting Heavy Items on the Top or Bottom Extremes: Heavy gear should always be close to your back and centered vertically. If it’s too high, it pulls you backward; too low, and it can unbalance you on uneven terrain.
- Not Utilizing Compression Straps: Loose gear inside the pack can shift, creating an unbalanced load. Compression straps help cinch everything down, making the pack feel more compact and stable.
- Carrying Everything in Outer Pockets: While pockets are great for quick access, stuffing too much weight or too many bulky items into them can throw off your balance and cause them to snag on branches. Reserve these for lighter essentials.
- Overpacking “Just in Case” Items: Every ounce counts. Unless it’s a critical safety item, question whether you truly need that extra gadget or outfit. Consider your trip duration and remoteness when planning. For longer trips, hiking meal prep ideas can help manage weight.
- Ignoring the Fit: A perfectly packed bag on an ill-fitting pack is still a recipe for discomfort. Ensure your pack’s torso length is correct and all straps are adjusted properly. For beginners, understanding how to choose hiking boots is just as vital as pack fit.
- Not Waterproofing Essentials: Even in clear weather, things can get damp. Using dry bags or waterproof stuff sacks for critical items like your sleeping bag, spare clothes, and electronics is a smart move.
These mistakes often lead to back pain, shoulder strain, and general exhaustion, turning what should be an enjoyable outing into a slog.
Packing for Different Trip Types
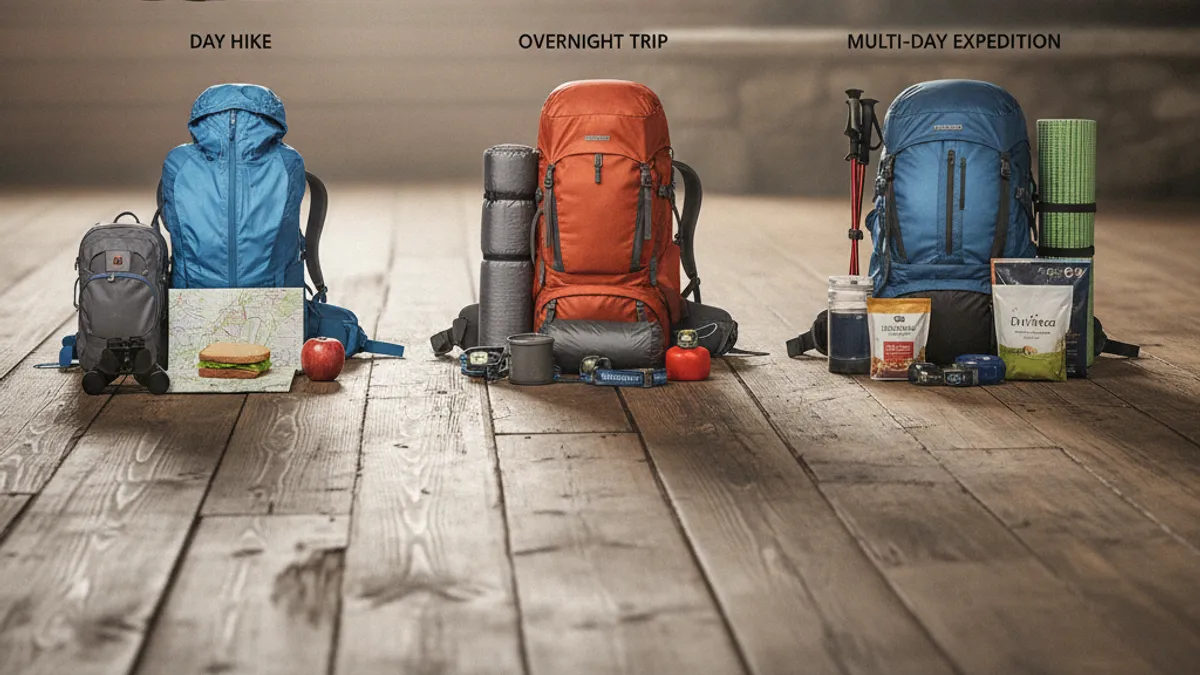
The way you pack your backpack will vary significantly depending on whether you’re heading out for a few hours or several days. A day hike requires a much more streamlined approach than an overnight or multi-day backpacking trip. Understanding these differences ensures you carry only what you need.
Day Hikes vs. Overnight Adventures
-
Day Hikes:
- Focus: Lightness and quick access.
- Essentials: Water, snacks, a light rain jacket, a basic first-aid kit, navigation tools, and perhaps an extra layer.
- Pack Size: Typically 10-30 liters. Gear can often be loosely organized or even stuffed if space allows.
- Weight Distribution: Less critical than for longer trips, but still important to keep heavier items closer to your back.
- Example: A day pack might contain a water bottle, a few energy bars, a windbreaker, a small map, and a mini first-aid kit. See what to bring on a day hike for a full list.
-
Overnight/Multi-Day Hikes:
- Focus: Carrying more gear efficiently, including shelter, sleeping system, and more food.
- Essentials: All day hike items, plus a tent or shelter, sleeping bag, sleeping pad, stove, fuel, cookware, more food, and potentially warmer clothing.
- Pack Size: Typically 45-75+ liters, depending on the duration and season.
- Weight Distribution: Absolutely critical for comfort over distance. Heavier items must be packed centrally and close to the spine.
- Example: A weekend trip pack will also carry a compact tent, a sleeping bag rated for the expected temperatures, a small stove system, and enough food for 2 days. For longer journeys, consider what is thru hiking?
The core principles of packing from a diagram remain the same, heavier items in the core, lighter items distributed, but the volume and type of gear dictate how you apply them. The amount of food you carry, for example, can be substantial, influencing your pack weight. Proper planning using a hiking calorie calculator can help determine food needs.
Essential Gear Checklist for Reference
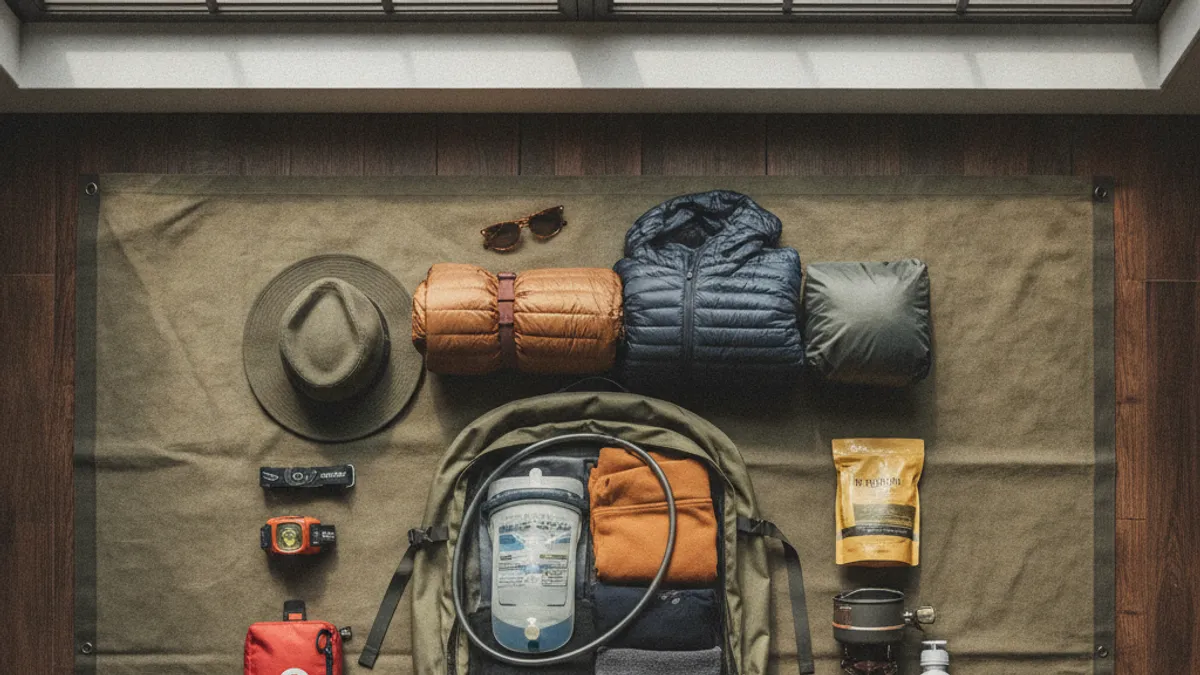
Having a solid checklist is your best friend for making sure nothing critical is forgotten, especially for longer trips. It helps ensure you’re not overpacking unnecessary items, either. This list covers the general categories you’ll need to consider for most backpacking excursions.
What You Absolutely Need
-
The Ten Essentials: These are universal for safety and survival on any outdoor adventure:
- Navigation: Map, compass, GPS device (and knowledge to use them).
- Sun Protection: Sunglasses, sunscreen, hat.
- Insulation: Extra clothing layers beyond what you start wearing.
- Illumination: Headlamp or flashlight with extra batteries.
- First-Aid Supplies: A comprehensive kit for injuries.
- Fire Starter: Waterproof matches, lighter, fire starter.
- Repair Kit and Tools: Multi-tool, duct tape, cordage.
- Nutrition: Extra food beyond minimum daily needs.
- Hydration: Extra water, or a way to purify it. Consider electrolytes for hiking to supplement water.
- Shelter: Emergency bivy sack or space blanket.
-
Backpacking Specifics:
- Shelter (tent, tarp, bivy)
- Sleeping Bag
- Sleeping Pad
- Backpack (sized appropriately, e.g., 50-75 liters for multi-day)
- Stove, Fuel, Cookware, Utensils
- Bear Canister or Food Bag (depending on regulations)
- Toiletries (biodegradable soap, toothbrush, toothpaste, trowel for catholes)
- Appropriate footwear and socks. Trail runners vs. hiking boots is a common discussion.
-
Clothing:
- Moisture-wicking base layers
- Insulating mid-layers (fleece, down)
- Waterproof and windproof outer shell (jacket and pants)
- Extra socks (wool or synthetic)
- Hat and gloves (even in warm weather, for evenings)
This checklist serves as a foundation. You’ll adjust it based on the season, expected weather, trail difficulty, and whether you’re car camping or truly backpacking. Always double-check your gear before heading out.
Pro Tips for Advanced Backpackers
Once you’ve mastered the basics of loading your pack, it’s time to think about refining your technique. Experienced backpackers often have specific strategies to optimize their load for efficiency, comfort, and quick access, especially on demanding trips. These tips go beyond just placing gear and focus on creating a truly seamless experience.
- Stuff Sack Color-Coding: Use different colored stuff sacks for categories like sleeping gear, clothing, and food. This makes finding what you need in low light or a hurry much easier, saving you time and frustration.
- Waterproofing Your Sleep System: Your sleeping bag is critical for warmth and safety. Always use a waterproof stuff sack or a durable dry bag for it. If your sleeping pad is inflatable, a dry bag for it is also a good idea.
- Utilize Hip Belt Pockets: Beyond snacks, these are perfect for lip balm, sunscreen, a small compass, or your phone for quick photo opportunities. Keep high-use items here for instant access.
- “Feather Bed” Your Pack: Think of items like down jackets or soft clothing as padding. Stuff them around rigid items like stoves or pots in the main compartment to prevent them from banging against your back and to fill dead space.
- Strategic Weight Distribution for Climbs: On steep ascents, slightly shifting heavier items a bit higher and closer to your shoulders can help you lean into the climb more effectively. Conversely, for descents, keeping the weight lower and more centered aids stability.
- Practice Packing Before a Big Trip: Don’t wait until the morning of your expedition to pack. Do a full practice run, paying attention to how the pack feels when worn. This allows you to adjust gear placement and catch any forgotten items.
- Consolidate and Minimize: Every item should serve a purpose. Look for multi-use gear and consider if you can use a lighter-weight version of something. Ultralight backpacking focuses heavily on this.
These advanced techniques are born from experience. They acknowledge that the way you pack can genuinely influence your ability to enjoy a challenging hike or enjoy a serene multi-day trip.
Choosing the Right Pack Size and Fit
The best packing diagram in the world won’t help if your backpack itself isn’t the right size or doesn’t fit your body. Pack volume is measured in liters, and the torso length needs to match your anatomy. Getting these two factors correct is the absolute first step before you even think about packing.
Matching Your Gear to Your Pack
- Pack Volume (Liters): This indicates the internal capacity of your backpack.
- Day Hikes (10-30 Liters): For carrying water, snacks, a light jacket, and essentials.
- Overnight/Weekend (30-50 Liters): Sufficient for 1-2 nights, including shelter and sleeping gear.
- Multi-Day (50-75 Liters): For trips lasting 3-5 days, accounting for more food and varied gear.
- Extended Trips (70+ Liters): For expeditions over 5 days, winter trips, or when carrying specialized gear.
The amount of gear you plan to carry is the primary driver for selecting liter capacity. For instance, if your trip requires specialized cold-weather gear, you’ll need a larger pack than for a summer trek.
- Torso Length: This is not your height but the length from your C7 vertebra (the prominent bone at the base of your neck) down to your iliac crest (the top of your hip bones). Most packs come in different sizes (S, M, L) or have adjustable torso lengths.
- Measure Accurately: Have a friend measure from the C7 to the imaginary line between your hip bones.
- Pack Fit: The padded portion of the hip belt should sit comfortably on your hip bones, with the shoulder straps curving over your shoulders without a large gap at the top.
- Adjustability: Many modern packs offer adjustable torso lengths, which can be a game-changer for finding a precise fit.
Trying on a pack with some weight in it is highly recommended. A pack that fits well will have the majority of its weight resting on your hips, not your shoulders. Poor torso fit can lead to chafing, discomfort, and ineffective weight transfer, no matter how well laid out your gear is. If you’re having trouble, seeking advice from an outdoor gear specialist is invaluable.